Setting Up Approvals on a Contract Job
This guide is for account managers/admins configuring who approves timecards on a contract job and how that approval works.
Where to find it
- Go to People → Clients, open the client, and open the Contract Job (Contract Job Detail).
- Scroll to the Approvers section. (There’s a blue ⓘ info icon next to the heading for in-app help.)
The Approvers section appears for standard timecard jobs. It’s hidden for certain timecard methods that don’t use approvals.
Prerequisite — Add the person as a contact on the client
Approvers come from the client’s contacts, so anyone you want to make an approver must exist as a contact first. If they’re already a contact, skip to Step 1.
To add a contact:

- Go to People → Clients → Contacts, open the client, and open its Contacts page.
- Click Add Contact. A new row opens for entry.
- Fill in the fields:
- First (required)
- Last (required)
- Email (required — must be a valid email)
- Title, Phone, Ext (optional)
- Active — leave checked so they can be used and can log in.
- Save. You’ll see a confirmation (e.g. “Added John Smith”) and the contact appears in the list.

What happens automatically:
- The contact is set up with the Client Contact role.
- If you entered an email, Bilflo automatically sends them a welcome/invite email so they can set their password and log in. (No email address = a placeholder system address is generated; they can be assigned to jobs but can’t log in or approve.)
Resend an invite: If a contact never set their password, click Reset Password on their row → confirm Send Reset Email. They’ll get a fresh link (“Reset Password Email Sent”).
Edit / deactivate: Click a contact to Edit their details, or uncheck Active and save to deactivate. The Registered checkbox (read-only) shows whether they’ve completed registration.
Adding a contact does not make them an approver — it just makes them available. Assign them to a job in Step 1 below.
Step 1 — Add your approvers
- Click + Add Approver.
- In the Add Approver window, find the person using the Search by name or email box.
- Click Select next to each person you want. They’ll show as Added.
- Click Close when done.
Things to know:
- Approvers come from the client’s contacts — the person must already exist as a contact (with a valid email) to appear here. If they’re missing, add them using the prerequisite section above, then come back.
- Contacts with system email addresses are excluded automatically.
- Each approver row shows their Name and Email. Remove someone with the ✕ in the Actions column.
- By default, approvers are set up to approve time.
Step 2 — Choose the approval order
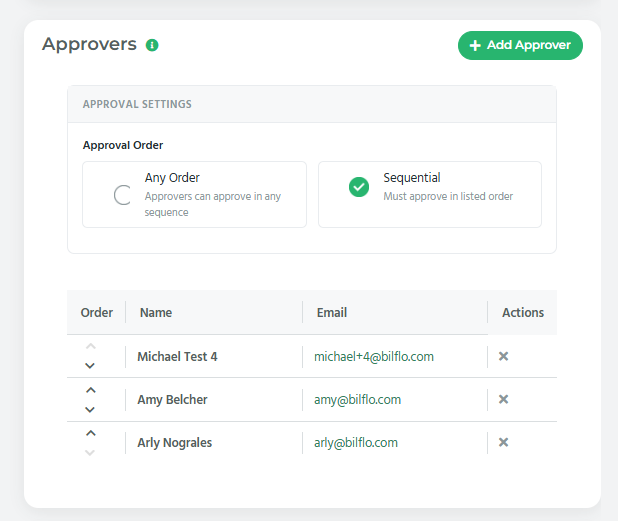
Once you’ve added at least one approver, the Approval Settings box appears. Pick an Approval Order:
- Any Order — “Approvers can approve in any sequence.” Everyone is notified at once; the timecard is approved once the required number of people sign off.
- Sequential — “Must approve in listed order.” Approvers are notified one at a time, top to bottom. Each person is only notified after the one before them approves, and everyone in the list must approve.
Plan note: Sequential is only available on higher-tier plans (Plan 4+). On lower plans it shows a lock icon and can’t be selected.
Step 3 — Set how many approvals are required
If you chose “Any Order” and have more than one approver, a Minimum Approvals Required field appears:
- Enter a number (e.g.
2of3approvers). - Minimum is 1; the max is the number of approvers you’ve added.
- Example: 3 approvers with a minimum of 2 means the timecard is approved as soon as any 2 of them approve.
If you chose “Sequential”:
- An Order column appears in the approver table. Use the ▲ / ▼ arrows to arrange approvers into the order they should sign off.
- Minimum approvals is handled automatically — everyone in the list must approve, in order, so there’s nothing to set.
Step 4 — Save the job
Save the contract job to apply the approval setup.
- ⚠️ A job needs at least one approver — if you try to save without one, you’ll be prompted to “Please add an approver.”
Quick reference
| Setting | Where | What it does |
|---|---|---|
| Add Contact | Client → Contacts | Creates the person (and emails them an invite) so they can be an approver |
| Approvers | Approvers section | Who can approve (pulled from client contacts) |
| Approval Order → Any Order | Approval Settings | Notify all at once; approve in any sequence |
| Approval Order → Sequential | Approval Settings | Notify one at a time, in the listed order (Plan 4+) |
| Minimum Approvals Required | Approval Settings (Any Order, 2+ approvers) | How many must approve before it’s done |
| Order ▲▼ | Approver table (Sequential only) | The sequence approvers sign off in |
How it behaves once live
- Any Order: all approvers get the email immediately; approved once the minimum is met.
- Sequential: only the first approver is emailed; after each approval the next person is notified; done when the last approves.
- Denied at any step: the timecard goes back to the contractor to fix and resubmit, and the approval cycle starts over.